You are here
Install the Wifi USB RTL8192cu on CentOS 5
How to Install the Wifi USB RTL8192cu on CentOS 5
Introduction
I am coming across more and more USB Wifi devices based on the Realtek 8192CU chip. My LARD project is based on CentOS 5 but does not include the kernel module needed for this chip. So here are instructions on how to get CentOS 5 and wireless with WPA2 running on this machine, without using NetworkManager. So if you have a server with no GUI, this should work. If you do opt to have a GUI, I don’t think NetworkManager will work with these instructions.
Requirements
Although CentOS 6.3 is out as of this writing, and 5.9 is the latest on the CentOS 5 track, my instructions were made on a CentOS 5.2 32bit Virtual machine with 1GB of RAM and a 20GB Hard Drive.
I started with a base install with no GUI.

That way I can show what other packages need to be installed aside from the base.
Check your USB chip
Run the command
/sbin/lsusb
And one of the entries should be
Bus 001 Device 003: ID 0bda:8176 Realtek Semiconductor Corp.
Additional Packages
Once the OS was built, I used yum to install the additional packages I needed, but before I could do that I had to import the GPG Key for CentOS 5
rpm --import http://mirror.centos.org/centos/RPM-GPG-KEY-CentOS-5
First I need the gcc and kernel-devel so I can compile the kernel
yum install gcc kernel-devel
Download the Realtek Driver
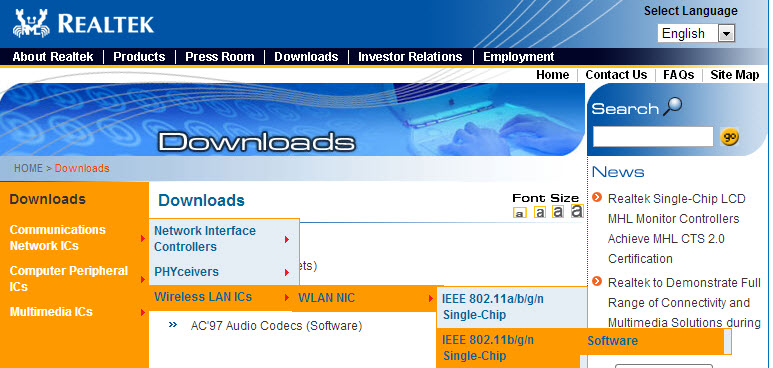
Then I had to go to realtek’s website www.realtek.com to download the drivers.
The site was buggy, uses javascript, and has some weird redirection which made wget not usable, so in the end, I ended up downloading the drivers from another machine with a web browser.
I clicked download, then went to
Communications Network ICs – Wireless LAN ICS – WLAN NIC – IEEE 802.11b/g/n - Software

Then I selected RTL8192CU and pressed Go

Which took me to the page where I could finally download the right drivers.

The file I downloaded was RTL8192xC_USB_linux_v3.4.4_4749.20121105.zip and had an md5sum of 791bde2cd1a13dfbbf2338c799dd8aaf
Extract Compile Install Load
Next I unzipped the file with the command
unzip RTL8192xC_USB_linux_v3.4.4_4749.20121105.zip
I then changed directories to where the driver was
cd RTL8188C_8192C_USB_linux_v3.4.4_4749.20121105/driver/
and untar’d the driver
tar zxvf rtl8188C_8192C_usb_linux_v3.4.4_4749.20121105.tar.gz
changed to that directory again
cd rtl8188C_8192C_usb_linux_v3.4.4_4749.20121105
and ran the command make to compile the kernel module
Then I ran
sudo make install
to install the kernel module.
Finally I can run
sudo /sbin/modprobe 8192cu
to install the kernel module.
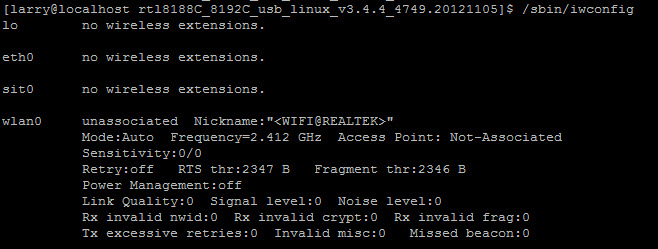
You can check if the module was installed properly by running
/sbin/iwconfig
You should see the wlan0 interface

At this point you should be able to run the command
iwlist wlan0 scan
and it should display all the SSID’s being broadcasted.
Setting up WPA2
From here on, it is assumed you will be logged in as root
Run the command where myssid is your ssid and mypassphrase is the passphrase for your wireless.
wpa_passphrase myssid mypassphrase
This should produce something like this
network={
        ssid="myssid"
        #psk="mypassphrase"
        psk=c22c1e6febc7875af85d033bbf15f5ca836633bac8eb16693fd58bff66fcb66c
}
Append that to /etc/wpa_supplicant/wpa_supplicant.conf
Here is a shortcut
wpa_passphrase myssid mypassphrase >> /etc/wpa_supplicant/wpa_supplicant.conf
and make sure to add proto=WPA2
network={
        ssid="myssid"
        proto=WPA2
        #psk="mypassphrase"
        psk=c22c1e6febc7875af85d033bbf15f5ca836633bac8eb16693fd58bff66fcb66c
}
Now edit /etc/sysconfig/wpa_supplicant
The final line should is
DRIVERS="-Dndiswrapper"
Change that to
DRIVERS="-Dwext"
Start the wpa_supplicant service
service wpa_supplicant start
and you should be able to run dhclient to grab an IP address from your wireless network,
dhclient wlan0
Persistent On Reboot
If you reboot, all your settings will go away.
So in order to have it network connectivity on reboot you will have to
Edit the /etc/modprobe.conf file and add
alias wlan0 rtl8192cu
to the file
Although the kernel module should load without this in there, it is good practice.
Create a file /etc/sysconfig/network-scripts/ifcfg-wlan0
DEVICE=wlan0
TYPE=Wireless
MODE=Managed
BOOTPROTO=dhcp
ONBOOT=yes
If you need to specify a static IP you can do it here.
Another way to create the file is to use the setup utility. That is another document.
There is a weird bug where wpa_supplicant starts after the network, it should start before.
Run the command
chkconfig --del wpa_supplicant
It does not delete it just takes it out of the start process
Now edit /etc/init.d/wpa_supplicant and change
# chkconfig: -12 88
To
#chkconfig -9 88
I know the # makes it look like a comment, but it is more than a comment
Now run the following command to add it back
chkconfig --add wpa_supplicant
Make sure wpa_supplicant starts on reboot using the following command
chkconfig wpa_supplicant on
Go ahead and reboot. You should be online.
DONE
Theme by Danetsoft and Danang Probo Sayekti inspired by Maksimer
